7 Farm & Food Photography Tips to Elevate Your Farm Marketing & Sales
- Apr 3, 2023
- 6 min read
Updated: Jan 21, 2025
7 photography tips to improve your marketing skills, showcase your farm, and increase sales

When your peak growing season begins to slow down, and you find yourself spending more time at the desk, and less time in the field, utilize this time indoors to come up with a marketing plan and create content to share online.
Whether you’re sharing the images on your online storefront, on social media, or in email marketing campaigns, you want high-quality content that stands out among the competition.
Continue reading for 6 tips to improve your food photography skills and help you take better photos of the food on your farm and in your fields.


1. Consider the platforms you’ll share your photos on.
Are you in need of simple product photos for your online shop? Do you want you post pics of your crew in the fields on Instagram or Facebook? Will you need hi-res photos for printed materials?
Consider every platform you’ll be using your images for, and make a list. Then take a variety of pictures in both portrait mode and landscape. You can always crop, resize, and edit your farm photos later.

2. Food prep on the photography set.
Yes, you need to prep your food to be photo ready. And no, we don’t mean you have to chop or cook anything (although that might be part of it!).
Consider how you want to present your different cuts of meat, raw fruits and vegetables, or value added products. Will the meat be raw or cooked? Should your vegetables be shot on the vine, or post-harvest? Should the fruits be whole, or cut?
No matter how you choose to capture your photos, make sure to properly “plate” your produce to show off its best features. That might include trimming branches or extra leaves, wiping off excess dirt, or simply spacing your harvested produce in a pleasing way to improve composition and whitespace. Don’t be afraid to play with your food!
Test out how your customers respond to different imagery.

Cooked meat
Prepared meat may look the most visually appealing, but it’s also the most labor intensive if you opt to create original content.
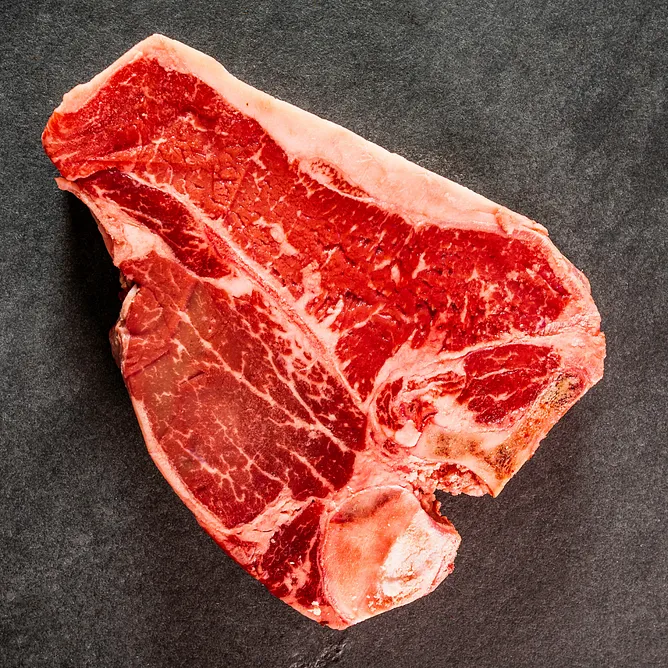
Raw Meat
Raw meat highlights the quality of the cut, but could be off-putting for some people.
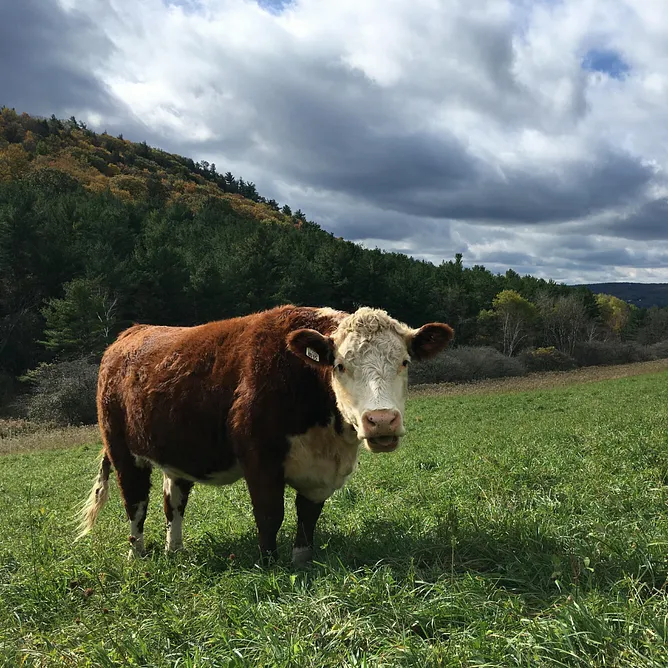
Field & Pasture
Showcasing animals in the field or pasture helps tell a story about your farming practices, which may resonate with customers interested in animal welfare and sustainability, but others may find the images unsettling, particularly if they associate them directly with the meat they consume.

3. Lighting is key 💡
Good lighting is one of the most important criteria for good food photography. Always try to shoot with natural light.
Indirect daylight is best — take photos on an overcast day, or set up in a shady spot on a sunny day. Indirect lighting provides a bright, even glow, while reducing harsh shadows or blown out colors that may result from harsh, direct sunlight.
PRO TIP If you use artificial lighting, light from the side, and assume you may have to spend more time editing.

via the Food Photography Academy
4. Pay attention to framing & composition.
If this is your first foray into photography, try all the angles. Play around with the camera settings if you’re feeling experimental, or opt for the auto settings.
If you’re using an iPhone, try portrait mode for close-up photos of food — it’s a game changer that beautifully captures details of your farm products and portraits of your crew.
As you grow more comfortable behind the camera, the angle you choose will depend on the subject you’re shooting and your personal preference.
3 widely used views in food photography include:


Eye Level
Shooting at eye level is just like it sounds: position the camera on the same level as the subject, which can forge a more intimate connection with the product.
Bird's Eye View
The Birds Eye View is shot from above and offers a highly graphic, intentional feel. It highlights the product and surroundings, but you still need to pay attention to your background and individual elements.
45 Degree Angle
The 45 degree angle, or 3/4 view, allows you to accentuate details on all sides of your product. This shot is particularly easy on the eye, as it utilizes the angle we see when we sit down to eat, so it can make your produce appear even more appetizing.

5. Learn to edit to optimize your content.
Photo edits should be small and subtle; if you framed your products and used natural, diffused lighting, you shouldn’t need to spend much time on editing. Because of the product you're photographing (fresh, seasonal food!) you want your images to look appetizing, natural, and as true-to-life as possible.
Cameras on our phones now rival professional models. Both the iPhone, Android, and Google phones have an “Auto” photo enhancer function that minimizes hands-on editing, while still allowing you to manually adjust the settings.
You may need to sharpen the image if shot on your phone, or increase contrast, brightness, and saturation, but only slightly. Scroll to the bottom for FREE photo editing tools.

6. Strategize how you will share new products.
Now that you’ve spent the time and energy to shoot and edit beautiful farm photos, you want to share them with your customers.
When you update inventory on GrownBy, ensure that your product descriptions and photos are accurate and consistent.
When adding new products, be sure to announce the new product to your followers and customers. Whether that’s updating your GrownBy account, sending an email to your CSA list, posting on your social media account, or updating the banner on your website, always announce your new or upcoming offerings.
This is an opportunity to share your farm’s story apart from the products you sell — showcase images of your field, track plant growth, or farming techniques to build up to the product announcement once you harvest and it’s ready for sale.

7. Consider outsourcing photography or marketing help as needed.
As farmers, we know that it takes a lot of time to shoot, edit, and upload photos and product descriptions of all your farm offerings. Between the planning and planting, weeding and harvesting, it can be easy to forget to document the process and products along the way!
Ask your crew to share photos from their day in the field to capture process pics and landscapes at different times of day. Not only will this provide a variety of content, but new perspectives.
You may also want to consider hiring a local photographer to shoot your farm, farm crew, fields, and farm products. If you grow the same crops every year, one shoot will provide content for years, and is well worth the investment. Just be sure to properly credit photos!
While original content is best, Unsplash is a phenomenal resource for free, high quality stock photography. Just search the keywords for the product you’re looking for, and download for free — you don’t even need an account!

Free Editing Tools, Apps & Resources
Best All-In-One Platform CANVA
Canva offers free account access to a limited number of stock photos, photo editing, and designing templates for marketing content. With ready-made templates and intuitive drag-and-drop design, Canva is suitable for beginners and experts alike.
The paid subscription grants access to a wider range of stock photography and videos, background remover, and allows you to build and save a brand kit for quick designs, among other design and editing tools.
Free Image Editors (no account required)
Pixlr best advanced online photo editor
Fotor best beginner free online photo editor
SnapSeed best free editing app on mobile
Free Stock Photography (no account required)
Unsplash high quality stock photos
Pexels free high quality stock photos
Kaboompics free high quality stock photos

GrownBy is the seamless, all-in-one solution for local farm sales.
We are the only farmer-owned marketplace app to platform your products and give consumers the opportunity to find and buy your farm products.
Build your farm shop on the GrownBy Marketplace for free and start selling your products in less than an hour. Everyone on our support team has farming experience and we will help you build your online farm shop, build custom CSAs, and get you SNAP Online Certified for free.
Stay updated on our farmers market tips.
Stay tuned for more information, tips, and inspiration for creating, marketing, and improving your product listings on your farm store. Grow with us at @farmgenerationscoop and @grownbyapp.
Comments